Blog Full Notice
back to main page
홈페이지 설정 강의 정리
motivation: how to customize minimal mistakes website which is hosted by github?
configuration 공식 문서: https://mmistakes.github.io/minimal-mistakes/docs/configuration/
시즌1
EP2. 이미지 매우 간단하게 추가하기
강의영상: https://www.youtube.com/playlist?list=PLIMb_GuNnFwfQBZQwD-vCZENL5YLDZekr
git, typora(이 프로그램을 통해서 이미지를 자동으로 입력해주는 것. markdown도 적어주고), visual studio code도 깐다. 근데 나는 obsidian으로 한다. obsidian 설정은 다음과 같다.
- files and links: (default )
- images라는 폴더를 만들어서 이미지를 여기에 저장한다. Default location for new attachment를 in the folder specified below로 설정해주고, images 로 설정해놓는다.
- 그러기 위해서, New Link Format을 반드시 Relative path to file로 설정하고, Use [[Wikilinks]] 설정을 반드시 해제한다.
- category를 설정하면, jekyll이 이미지 access를 /category/images/ 에서 한다. 그래서 항상 _posts의 글에 사진을 저장하려면, _posts에 해당 category에 해당하는 폴더를 만들어서 하면 된다. 이때 category가 2개 있다면, 폴더를 두개 nesting해서 해야
../../../images/xxxxx.png이렇게 되게 된다. - 항상 왼쪽 sidebar에 나와있는 ‘open today’s daily note’ 를 통해서 파일을 만들면, _posts 파일에 날짜로 시작하게 파일을 만들도록 만드는 것이 목표다. 아래도 다 그렇다.
- template
- template folder location: Template
- daliy notes:
- date format: YYYY-MM-DD-tit\l\e # 이렇게 설정해서 제목을 라고만 해도 알아서 날짜-title 까지 나오게 되는 것이다.
- new file location: _posts
- template file location: Template\/{{date}} ….

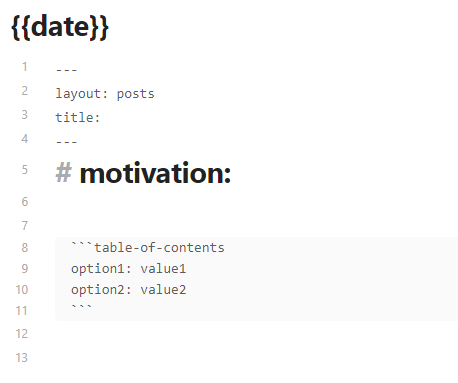
(이렇게 Template 폴더의 라는 이름(제목)을 가지도록 만들면 된다.)
- community plugin1: paste image rename
- image name pattern: -
- 결국에는 images 라는 폴더에 이미지를 더 넣기 위해서. 이제 이미지를 그냥 obsidian에 drag에서 쉽게 넣을 수 있게 됨.
- community plugin2: automatic table of contents
- 이 파일 맨 위에 ``` 를 통해서 동적으로 table of contents(heading으로 되어있는 것들을 index시킨 것)을 확인할 수 있음
- .gitignore 에 설정 추가
#.gitignore 파일에 아래 추가
# obsidian trash
.trash
.obsidian
Template
‘open today’s daily note’ 를 통해서 다 수정했으면, github desktop으로 commit하고, push origin 하면 된다.
EP3. 업데이트 내역을 실시간으로 확인하기
공식문서 링크: https://mmistakes.github.io/minimal-mistakes/docs/installation/#install-dependencies
- ruby(with devkit, MSYS2 and MINGW development toolchain까지, 그리고 8XX MB짜리로) 설치
- ctrl + r –> cmd –> gem install jekyll 하고, gem install bundler
- mujisung.github.io 폴더가 있는 곳에서 오른쪽 클릭 –> 여기에 powershell 창 열기 –> C:\Users\wys00\Desktop\projects\mujisung.github.io 여기로 이동 –> 여기에서 bundle install
- 여기에서 bundle exec jekyll serve 로 엔터 누른다. (에러가 발생하면, bundle add webrick 하고, 다시 bundle exec jekyll serve 누르면, 서버 구동된다. bundle exec jekyll serve
그러면 localhost에서 4000 port에서 서버가 구동되었다는 것을 알 수 있다.
EP4. 블로그 설정 매우 쉽게 변경하기 - NO코딩! (config.yml 활용)
공식문서 링크: https://mmistakes.github.io/minimal-mistakes/docs/configuration/
configuration 하는 방법들이 나와있다. 이 공식문서 중에서, 몇가지만 바꾸어보자. 테마를 바꾸고 나서는, configuration을 바꾸면, server를 다시 실행시켜줘야 해서, ctrl + c를 누르고, 다시 bundle exec jekyll serve를 눌러주면 된다. 그럼 페이지가 바뀔 것.
EP5. 댓글 & 구글 애널리틱스 추가하기
굉장히 어렵게 함. [[#번외#minimal mistakes 구조|minimal mistakes 구조]] 이거 참조해서,
'_layout 폴더 안의 post.html'의 frontmatter를 다음과 같이 수정
---
#layout: archive
layout: single
---
이렇게 수정한다. 그리고 댓글은
디스커스: https://disqus.com/ 여기서 댓글 기능을 관리하면 된다.
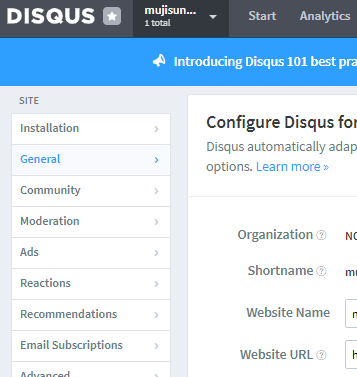 여기에서 Shortname 것을
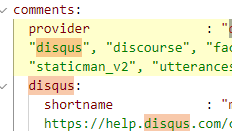 shortname: 여기 부분에 쓰면 된다.
구글 어낼리틱스
# Analytics
analytics:
  provider               : "google-gtag"
  google:
    tracking_id          : "G-XXXXXXXXXX"
    anonymize_ip         : false
이렇게 Gtag를 받은 다음에, https://analytics.google.com/analytics/web/ 여기로 접속해서 얼만큼 들어오고 있는지 관리하면 된다.
EP6. 테마변경, SNS 링크 삽입, pagination 설정
author 부분이랑 페이지 맨 밑의 footer를 수정 공식 configuration 페이지 쭉 본다. Timezone: Asia/Seoul 설정한다.
EP7. 카테고리 기능, 태그 기능 추가하기
- jekyll-archives: 부분 주석 해제 (_config.yml)
- _pages 폴더에서, 파일 하나 추가, 이름은 ‘category-archive.md’ 로 추가. 여기에
---
title: "Category"
layout: categories
permalink: /categories/
author_profile: true
sidebar_main: true
---
이렇게 추가.
- data/navigation.yml 파일에, 아래와 같이 하게 되면, 오른쪽 위 tab에 category를 볼 수 있는 tab이 나온다.
# main links
main:
  - title: "Category"
    url: /categories/
  # - title: "About"
  #   url: https://mmistakes.github.io/minimal-mistakes/about/
  # - title: "Sample Posts"
  #   url: /year-archive/
  # - title: "Sample Collections"
  #   url: /collection-archive/
  # - title: "Sitemap"
  #   url: /sitemap/
그러면 _posts에 category: 하면, 를 지정만 하면 된다.
tag 기능
_pages 폴더에서, ‘tag-archive.md’ 파일을 만들어준다. 그리
---
title: "tag"
layout: tags
permalink: /tags/
author_profile: true
sidebar_main: true
---
그러면 _posts에 있는 아무 post에 categories: coding tag: python 이렇게 추가하고,
data/navigation.yml 파일에,
# main links
main:
  - title: "Category"
    url: /categories/
  - title: "tag"
    url: /tags/
이렇게 tag도 추가하면 끝이 난다.
EP8. 글 목차, 404 page 구현
_pages에 404.md를 추가해서
_posts 폴더에 글을 올릴 것 아닌가? 이 글에서 toc: true 로 frontmatter에 적어놓으면, toc가 생기게 된다.
EP9. 구글, 네이버 검색엔진 등록하기
구글: https://search.google.com/search-console/ 네이버: https://searchadvisor.naver.com/console/board
EP10. 블로그 내 글 검색기능 추가하기
- author profile 보이기/안보이기 옵션
- sidebar navigation 수정
- 검색 기능 추가
1. author profile 보이기/안보이기 옵션
author_profile: false 하면 author profile 보이기/안보이기 할 수 있다.
2. sidebar navigation 수정
# _data/navigation.yml 에, 이거 추가
docs:
  - title: "Index"
    childern:
      - title: "Category"
        url: /categories/
      - title: "Tag"
        url: /tags/
#frontmatter에
sidebar:
	nav: "docs"
3. 검색 기능 추가
search.md 파일을 _pages 밑에 만든다.
---
title: Search
layout: search
permalink: /search/
---
_data 에서 navigation.yml 에 추가.
main:
	title: "Search"
	url: /search/
frontmatter에 search: false라고 적으면 그 글은 검색되지 않는다.
EP11. 블로그에 설정된 폰트(글씨체) 변경하기
이거는 적용하지 않는다.
EP12. 공지사항(Notice), 버튼, youtube 영상 추가하기
공지사항
공지사항 쓰는 법은 (: .notice–danger)
(: .notice--danger)
문장 밑에 이렇게 쓰면 된다. 근데 이렇게 쓰지 않고
<div class="notice--info" markdown="1" style="font-size:15px">

</div>
형식으로 쓴다. div로 하는 이유는, obsidian에서도 좀 차이점이 잘 나타나고, font size를 div tag의 attribute로 조정할 수 있기 때문이다.
또 heading, ul/ol tag 안에 li tag도 넣을 수 있따. div tag를 활용하면, 다음은 그 예시다.
<div class="notice--info" markdown="1" >
<h1> heading 1 </h1>
<h2> heading 2 </h2>
<h3> heading 3 </h3>

<ol>
<li> hi</li>
<li> hi</li>
<li> hi</li>
<li> hi</li>
</ol>

<ul>
<li> hi</li>
<li> hi</li>
<li> hi</li>
<li> hi</li>
</ul>

</div>
notice의 종류에는 danger(빨간색), success(초록색), info(하늘색), warning(노란색) 등이 있다.
버튼
버튼은
[홈페이지](mujisung.github.io){: .btn .btn--warning}
이렇게 하면 버튼이 만들어진다.
[홈페이지](mujisung.github.io){: .btn .btn--warning .btn--x-large} # 엄청 큰 버튼
[홈페이지](mujisung.github.io){: .btn .btn--warning .btn--large} # 큰 버튼
[홈페이지](mujisung.github.io){: .btn .btn--warning .btn--small} # 작은버튼
youtube 영상 추가하기
<!-- Courtesy of embedresponsively.com -->

  <div class="responsive-video-container">
    <iframe src="https://www.youtube-nocookie.com/embed/https://www.youtube.com/watch?v=q0P3TSoVNDM&list=PLIMb_GuNnFwfQBZQwD-vCZENL5YLDZekr&index=13" frameborder="0" webkitAllowFullScreen mozallowfullscreen allowfullscreen></iframe>
  </div>
이 형식을 그대로 따라하고, 유튜브 링크만 바꿔서 넣으면 된다. 이떄 유튜브 링크는 공유 버튼을 통해서 나온 링크를 넣는 것이 아니라, 웹사이트 위에 나와있는 걸로 넣어야 작동된다.
EP13. github에 grassing하기
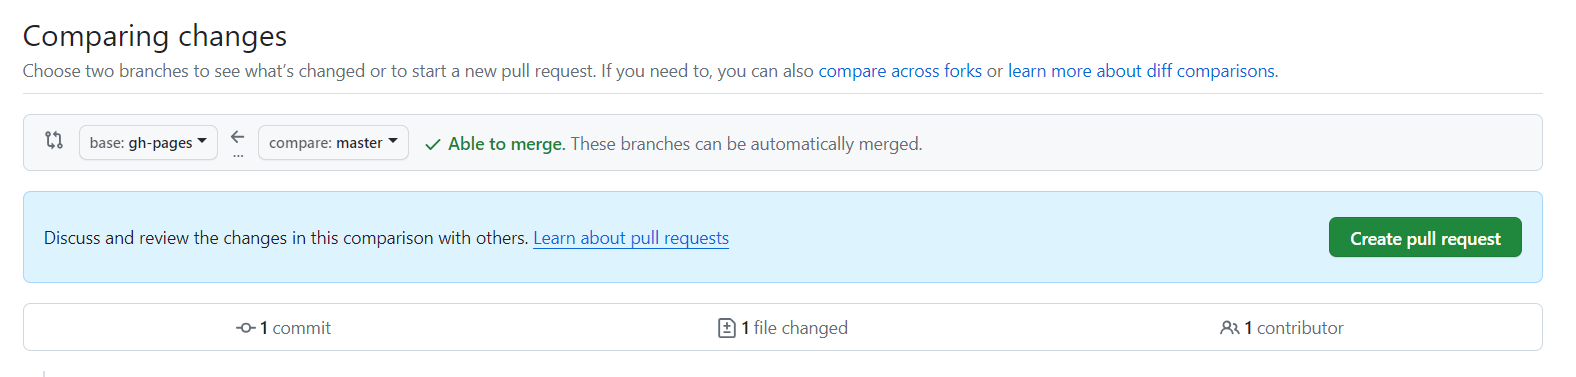
github에서 branch로 가서, gh-pages라는 branch를 먼저 만들어주었다.
그 다음에, commit과 push를 master(평소대로)에 한다.
그 상태에서, 위 사진과 같이, master에 있는 변화를, gh-pages 에 적용한다고(gh-pages <- master), pull request tab에서 적용해주고(만약에 master <– master 로 설정되어있으면, compare across forks를 통해서 바꾸어준다.) pull request 하면, contribution에 기록되게 된다.
즉 grassing의 단계는, 평소대로 commit 다 하고, pull request를 gh-pages <- master 로 하면 되는 것이다.
시즌2
강의영상: https://youtube.com/playlist?list=PLIMb_GuNnFwfMm3alTSOmDK4AnpdG7USY&si=kNWB8y6eYwCrp8gN
EP22. 연도별 포스팅 아카이브 생성하기
/test/_pages/year-archive.md 를 _pages 에 옮긴다. 그리고 _data/navigation.yml에
main:
  - title: "CV"
    url: /CV/
  - title: "By Year"
    url: /year-archive/
이거 추가. 그런데 posts layout에서 연도별 표시가 주석표시되어있으면 안되긴 함. /test/_pages/year-archive-grid.md를 옮기고, 이거를 쓸 수도 있음.
EP24. 사이드바에 카테고리 & 태그 숫자 카운트와 함께 추가하기
_data/navigation.yml파일에서 맨 밑에다가counts: - title: "카테고리" use: true - title: "태그" use: true추가
_includes/nav_list라는 부분에, 원래 코딩이 되어있을 것이다. category, tag에 있는 코드를 참조해서 코딩했다. 영상에서 제공한 코드를 nav_list에 넣는다.
여기서 폰트 크기를 바꾸고 싶으면, 이 줄만 수정해주면 된다. 1. taxonomy__count가 tag가 몇개 있는지 알려주는 숫자에 대한 class고, 2. font size가 tag 이름에 해당하는 폰트 크기다.
<strong style="font-size: 16px;"></strong> <span class="taxonomy__count" style="font-size: 14px;"></span>
_posts에 올리는 글의 frontmatter에서 sidebar: 의 nav: 에 “counts”를 등록한다.
sidebar:
	nav: "counts"
`_pages/ 에 있는 오른쪽 위 banner에 나오는 페이지들도, sidebar: nav: 설정이 있다. 여기도 nav를 “docs”에서 “counts”로 변경해준다.
EP25. 블로그에 상단 배너 추가하기
- _includes 폴더에서, 새로운 파일을 생성, 새로운 파일의 이름은,
top-banner.html로 생성, 여기에 html/CSS로 banner의 스타일을 지정해주게 된다.
<p class="notice--info"> <!-- _notice.scss에서 정의된 class명 -->
	<strong>Github 블로그 제작기</strong>
	<br>
	<a href="https://mujisung.github.io">블로그 홈으로 돌아가기</a>
</p>
- 우리는 single.html을 쓰고 있기 때문에, 여기에
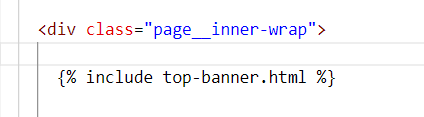 이렇게 추가하게 된다. 왜
 page__inner_wrap밑에다가 했냐면, 처음에는 single 밑에다가 했는데, 조금 이상하게, 다른 것과 겹치게 들어가게 되어서, f12를 통해서 element 검사를 통해서, 어디에 들어갔으면 하다. 를 분석한 다음에, inner_wrap 제일 위에 들어갔으면 해서 여기에 넣은 것이다.
즉 상단 배너를 수정하고 싶으면, _includes/top-banner.html 을 수정하면 된다.
번외
1. LaTeX 추가하는 방법
latex 추가하는 방법 링크 유의: 근데 이거는 그냥 $ 한개로 하면 안되고 다 $$ 두개로 감싸야 가능하다.
2. 사진 테두리 원형에서 사각형으로 바꾸는 방법
경로: mujisung.github.io/_sass/minimal-mistakes/_sidebar.scss 에서
.author__avatar {
  display: table-cell;
  vertical-align: top;
  width: 36px;
  height: 36px;

  @include breakpoint($large) {
    display: block;
    width: auto;
    height: auto;
  }

  img {
    max-width: 110px;
    border-radius: 1%;

    @include breakpoint($large) {
      padding: 5px;
      border: 1px solid $border-color;
    }
  }
}
border-radius가 0에 가까울수록 사각형으로 감. 50%는 원임.
3. 이미지 크기 조정하는 방법

이렇게 되어있는 것에서 대괄호 안에 '\|숫자' 를 넣으면 size가 조정이 된다.
[\|250](../images/20240208-2024-02-07-홈페이지%20설정%20강의%20정리-1.png)
4. minimal mistakes 구조
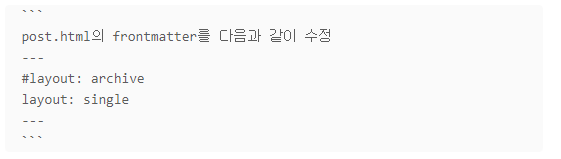
post.html의 frontmatter를 다음과 같이 수정
---
#layout: archive
layout: single
---
_config.yml 파일을 수정하게 되면, 예를 들어서, layout이 지금 single로 설정이 되어있다고 해보자. 그러면 _layout 폴더에서, single.html이 실행이 된다.
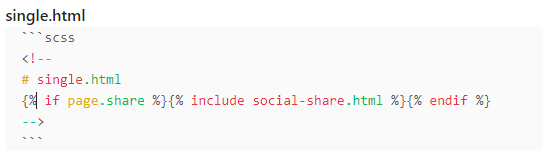 이런 식으로 single.html 파일이 구성되어있는데, if page.share는 share 변수가 true이면, social-share.html 파일을 화면에 추가하게 된다.
social-share.html 파일은 다음과 같이 되어있다. (느낌상 layout (scss)와 관련된 html 파일들을 _layout 폴더에 있고, layout이 조건에 따라서 추가/추가하지 않는 html 출력 버튼/정보들에 대해서는 _includes에 있는 것 같다.)
이런 식으로 single.html 파일이 구성되어있는데, if page.share는 share 변수가 true이면, social-share.html 파일을 화면에 추가하게 된다.
social-share.html 파일은 다음과 같이 되어있다. (느낌상 layout (scss)와 관련된 html 파일들을 _layout 폴더에 있고, layout이 조건에 따라서 추가/추가하지 않는 html 출력 버튼/정보들에 대해서는 _includes에 있는 것 같다.)
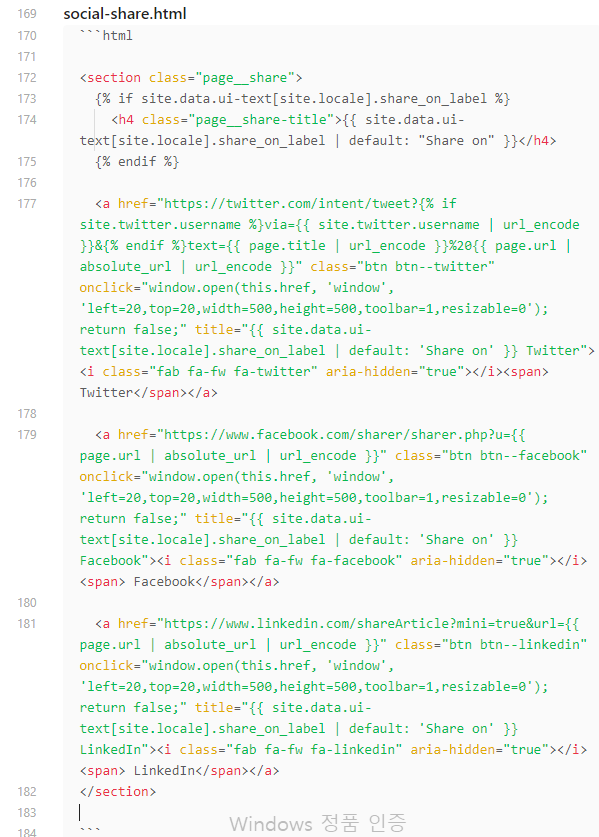
그래서 이런 버튼들을 조건이 맞으면 출력을 하게 되는 것이다.
이런 상황에서, 우리는 _posts 폴더에, 우리가 쓰는 글들을 저장한다. 근데 이떄 layout을 frontmatter에 posts로 등록을 해놓는데, 그러면 layout을 post.html을 먼저 참조할 것이다. 이 post.html이 근데 archive.html을 참조하고 있었고, 그리고 archive.html이 다시 default.html을 참조하고 있었다. 그래서 single.html에 공유기능이 있는건데, layout: posts로 설정을 하면 single.html 파일을 참조를 안하는 것이었다. 그래서 post.html에서 single.html을 참조하고, single이 다시 default.html을 참조하니깐, 그렇게 되면 공유 버튼이 보이는 것이다.
5. .md files in _post folder must not have scss grammar!!
왜 그런지는 모르겠지만, 약간 jekyll이 문서들을 다 해석하려고 하기 때문인 것 같음.
6. mujisung.github.io 들어갔을 때 맨 처음 나오는 index.html 파일에서 frontmatter 추가해서 왼쪽 navigation 부분에서 목차가 나올 수 있게 변경하는 방법
index.html에서
---
layout: home
author_profile: true
sidebar:
  nav: "docs"
---
sidebar를 추가해서 sidebar가 나올 수 있게 한다.
7. 왼쪽 sidebar에서 1. index가 자기소개보다 먼저 나오게 하는 방법 + 2. 이미지가 밑으로 나오게 할 수 있는 방법
./index.html –> _layouts/home.html –> archive.html –> sidebar.html –> _includes/sidebar.html 에서 author를 밑으로 내림 –> author-profile.html 에서 ‘author.avatar’를 맨 밑으로 내림(얼굴 사진)
8. EP12에서 notice 관련 설정을 조금 바꾸었다.
mujisung.github.io/_sass/minimal-mistakes/_notices.scss 에서 font-size: $type-size-6 !important; 를 font-size: $type-size-5; 로 바꿨다. 그 이유는, <div class='notice' markdown="1"> </div> 형식으로 적으면, style='font-size=15px' 로 font size를 조절할 수 있기 때문이다. 그래서 !important를 뺐고,(안빼면 font 수정이 안됨) 그리고 $type-size-5로 바꾼 이유는, 5가 6보다 크고, 5가 딱 15px로 기본 글씨체 크기와 같기 때문이다.
9. timezone을 KR로 바꾸었을 때, local server (gem? ruby?)에서 오류나는거 해결방법
source "https://rubygems.org"
gemspec

# Windows does not include zoneinfo files, so bundle the tzinfo-data gem # 출처: https://jennysgap.tistory.com/entry/Github-Pages-04-타임존-관리 [jennysgap:티스토리]
gem 'tzinfo'
gem 'tzinfo-data', platforms: [:mingw, :mswin, :x64_mingw]
10. 에드센스 등록하는 방법
11. github.io에 posting하기 위해 알아야할 규칙들
- the file name must be in below format
2024-02-04-file_name.md
2024-05-01-any_name.md
-
must save the .md file in _post folder
-
all .md files should start with
---
layout: post
title: Welcome to Jekyll!
---
this header. you can check the reference form here
12. 댓글 위에 연도별로 정리된 글 너무 많아서 수정
post.html에서 <ul class="taxonomy__index"> 랑 <section id="" class="taxonomy__section"> 주석처리 해서 나타나지 않게 설정
그리고 EP22, 연도별 By Year 오른쪽 위 toggle에서, 연도별로 나타난 tab을 만들기 위해서, posts_for_year_with_year_taxonomy.html 을 새로 만들었는데, 이거는 post.html에서 주석처리한 부분을 다시 살린 것. 그렇게 함으로써, _pages/year-archive.md가 posts_for_year_with_year_taxonomy.html를 활용함으로써, 글에 연도별 정리가 될 수 있도록 한 것이다.
13. 사진과 이름을 누르면 CV site로 갈 수 있도록, _includes/author-profile.html 에서 author__avatar과 author__content를, 바꿈
<a href="https://mujisung.github.io/"> 에서 <a href="https://mujisung.github.io/CV/"> 로 수정. 왜냐하면 이름과 사진을 눌렀을 때, 기본 main 화면인 / 여기가 아니라, /CV/로 갈 수 있게 하려고 함임.
14. content의 너비, 글 폰드 등 설정
출처: https://eona1301.github.io/github_blog/GithubBlog-Content-Width/
댓글남기기